初建GitHub博客
初建 github 博客,并使用 jekyll 美化,算是一段比较复杂的过程。
以下我来回顾一下我的过程
第一部分: Github Pages
首先你需要有个 [repository] 命名为 [你的博客名]
并在此上传一个 html 文件到你的仓库 ( master 分支)
#index.html
<!DOCTYPE html>
<html lang="en">
<head>
    <meta charset="UTF-8">
    <title>Document</title>
    <style type="text/css">
        h1{
            text-align: center;
            font-size: 50px;
        }
    </style>
</head>
<body>
    <h1>Hello Github</h1>
</body>
</html>
进入你新建的博客中,选中菜单中的 Settings

接着下滑找到我们的GitHub Page,使其作为页面展示,选中master分支就好
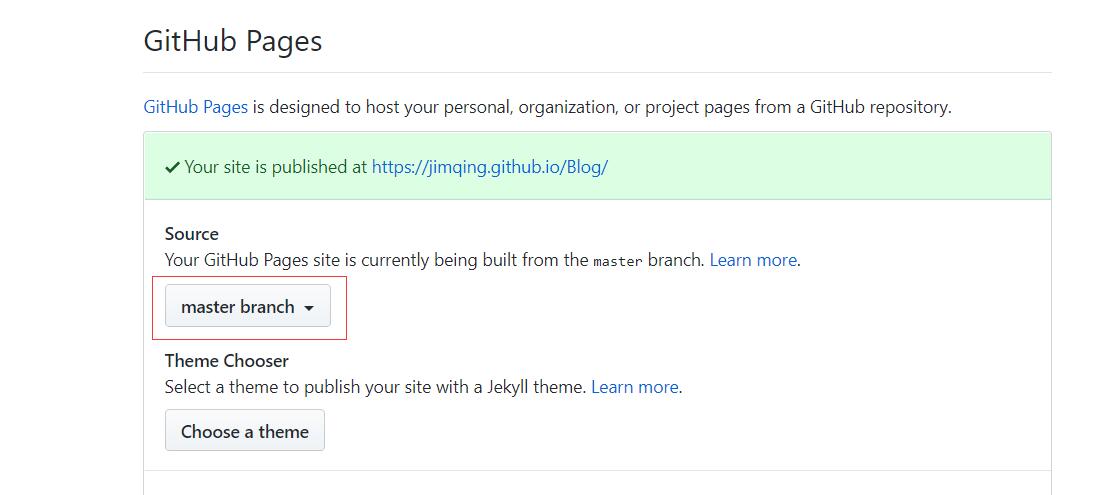
接着访问图中对应的链接 https://[用户名].github.io/[仓库名]]/
即可看到效果。
第二部分 安装 Jekyll
想要安装 Jekyll 需要安装 Python Ruby 以及 nodeJs.
安装完上述环境并置入环境变量后,检查 ruby
ruby -v
# 对应版本号
gem -v
# 对应版本号
由于 gem 在大陆使用是会被墙的,如果没有科学上网,可以选择镜像
gem sources
#查看源
gem sources -r https://rubygems.org/
#删除默认源
gem sources -a https://gems.ruby-china.com
#更换为镜像源
gem sources -u
#更新源的缓存
如果显示正常,我们就完成了对应的环境安装,安装 Jekyll
gem install jekyll接着我们去 jekyllthemes 选一个喜欢的主题
并下载解压,通过 gem 安装 bundle
gem install bundle
#安装 bundle
bundle -v
#对应版本号
bundle install
#安装依赖
运行之前,打开 _config.yml 进行简单的配置,其中很重要的一点是 baseurl 需改成”/[repository]” 否则上传到线上之后会出现样式丢失!
# Setup
name:         Blog
tagline:      A responsive theme for your project on GitHub Pages
baseurl:      "/Blog"
locale:       "en"
email:        jimqing@yeah.net

# Gems
gems:
  - jekyll-paginate

# Others
markdown: kramdown

# See change before re-build
准备好了一切之后,运行!
bundle exec jekyll serve -w
#运行!!
#-w 表示实时检查改动,可以边书写博客一边查看效果
运行成功,可在 http://127.0.0.1:4000/ 查看效果
编写完成后,通过 jekyll 打包
bundle exec jekyll build
#打包完成!
打包后,会生成对应的文件在 _site下,将_site的内容复制到到你的 [repository] 目录下,push !
完成后即可在 https://[用户名].github.io/[仓库名]]/ 下查看你的博客。
Tips:
在更换源之后如果依旧下载异常,检查下载主题目录下是否有 Gemfile 文件,更换其中的source 即可
# A sample Gemfile
source "http://gems.ruby-china.com/"
gemspec

gem 'jekyll'
gem 'jekyll-paginate'
gem 'kramdown'
gem 'pygments.rb'
在执行 install 的时候需要检查你的主题的文件 jekyll-[主题名]-theme.gemspec 对应的版本是否与你的安装版本相同,否则会 install 报错
spec.add_development_dependency "jekyll", "~> 3.2"
spec.add_development_dependency "bundler", "2.0.1"
spec.add_development_dependency "rake", "~> 10.0"